Chapter 3 - Work Shop
My first task was to get my
workshop ready. I sectioned off part of a warehouse and made it my Cozy factory.
It is about 25’ x 30’ – much larger than my garage. Two immediate
advantages, my wife can keep her car in the garage, and my Cozy can stay away
from the family rabbit that sheds continuously.
Work Bench
 The first thing I built was the workbench. I did a lot
of reading from the Cozy archives and decided to go for the maximum dimension of
4’x12’. Since the key criteria for the workbench was a flat surface, that
means the support beam must be pretty straight. My neighbor happens to work for
a lumberyard that has a machine to put straight edges on both sides of the
material. It can be a beam or a board. That was convenient, so I ordered two
2”x6”x12’ beams from him. The next day, he returned with the two straight
12’ beams and four 4’ cross beams (for free)
– with straight edges as well (What a guy!). They trimmed the cross
beams to 3’6” long because I intend to leave a 3” overhang on each side
of the workbench for clamping in the future. I went to Home Depot and bought a
10’ (4x4) and had them cut it down to four (28”) lengths, leaving an 8” piece
(this is useful later). The first thing I built was the workbench. I did a lot
of reading from the Cozy archives and decided to go for the maximum dimension of
4’x12’. Since the key criteria for the workbench was a flat surface, that
means the support beam must be pretty straight. My neighbor happens to work for
a lumberyard that has a machine to put straight edges on both sides of the
material. It can be a beam or a board. That was convenient, so I ordered two
2”x6”x12’ beams from him. The next day, he returned with the two straight
12’ beams and four 4’ cross beams (for free)
– with straight edges as well (What a guy!). They trimmed the cross
beams to 3’6” long because I intend to leave a 3” overhang on each side
of the workbench for clamping in the future. I went to Home Depot and bought a
10’ (4x4) and had them cut it down to four (28”) lengths, leaving an 8” piece
(this is useful later). |
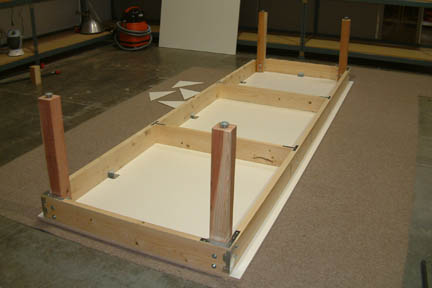
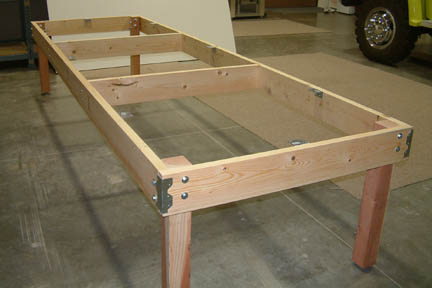
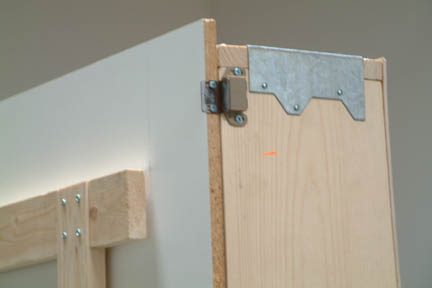
 I built the workbench upside
down as shown above. First, I laid down a piece of old carpet on the cement
floor to ‘take the bumps
out’. Then I laid down the table top on the carpet.
I used the tabletop (4' x 8' coated particle boards) to line up the frame because the
boards are pretty square to begin with. Using 2 C-clamps and the 8” x 4” x
4” post, I held the long and cross beams of the table at 90 degrees.
While clamped, I screwed down the top and the side angle brackets. Repeat the
above with all four corners and the frame is formed. I built the workbench upside
down as shown above. First, I laid down a piece of old carpet on the cement
floor to ‘take the bumps
out’. Then I laid down the table top on the carpet.
I used the tabletop (4' x 8' coated particle boards) to line up the frame because the
boards are pretty square to begin with. Using 2 C-clamps and the 8” x 4” x
4” post, I held the long and cross beams of the table at 90 degrees.
While clamped, I screwed down the top and the side angle brackets. Repeat the
above with all four corners and the frame is formed. |
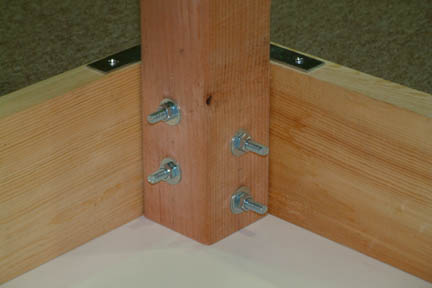 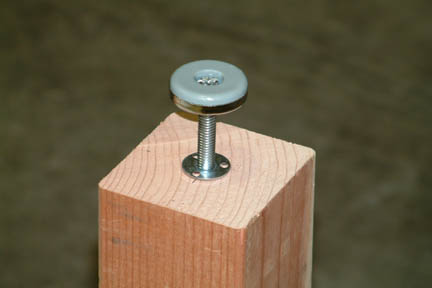 Using a drill press, I pre-drilled 4 bolt holes
(3/8” dia.) on one end of the leg, and 1 at the end for the
adjustable feet. I then removed the 8” (4x4) and replaced it with the
real leg 8"x4"x4" and re-clamp. Using the pre-drilled
bolt holes as a guide, I
drilled through the crossbeams. Bolt them down with a 6”x 3/8” bolt and viola!
– one corner is done. Repeat 3 more times with the rest of the corners. Using a drill press, I pre-drilled 4 bolt holes
(3/8” dia.) on one end of the leg, and 1 at the end for the
adjustable feet. I then removed the 8” (4x4) and replaced it with the
real leg 8"x4"x4" and re-clamp. Using the pre-drilled
bolt holes as a guide, I
drilled through the crossbeams. Bolt them down with a 6”x 3/8” bolt and viola!
– one corner is done. Repeat 3 more times with the rest of the corners. |
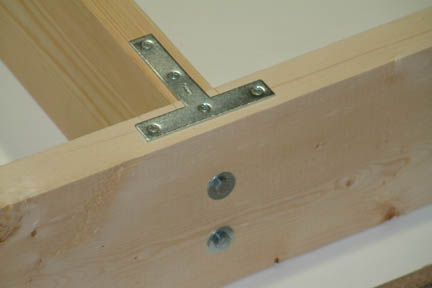 I used a T-bracket and 2 lag bolts on each end of the
crossbeam. The lag bolts help to pull the bows out of the middle of the 12’ beams. I then used 8 L brackets and pre-drilled them in place for holding
the top of the table to the frame. Since the tabletop is not part of
the workbench support structure, I did not use heavy-duty bolts to hold it down.
It rests on the sturdy frame just fine. I just used a few brackets to keep it
from sliding around. Besides, the tabletop will be easy to replace as needed. I used a T-bracket and 2 lag bolts on each end of the
crossbeam. The lag bolts help to pull the bows out of the middle of the 12’ beams. I then used 8 L brackets and pre-drilled them in place for holding
the top of the table to the frame. Since the tabletop is not part of
the workbench support structure, I did not use heavy-duty bolts to hold it down.
It rests on the sturdy frame just fine. I just used a few brackets to keep it
from sliding around. Besides, the tabletop will be easy to replace as needed. |
 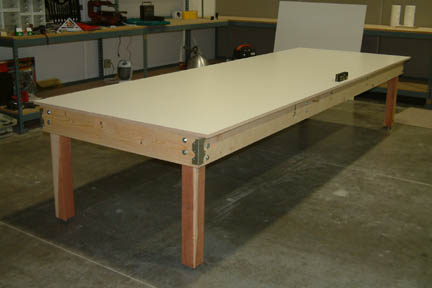 After I screwed in the adjustable feet, the bench
frame was ready to be flipped over onto its legs.
I was surprised that I could flip it over by myself. The frame was
relatively light but sturdy. I had a harder time getting the table top onto the
frame by myself. After lining up the table top(s) to their pre-drilled
bracket positions, I pulled them down against the frame and the table is done.
Only minor adjustments with the adjustable feet were needed to achieve my 0
degree with the smart level. After I screwed in the adjustable feet, the bench
frame was ready to be flipped over onto its legs.
I was surprised that I could flip it over by myself. The frame was
relatively light but sturdy. I had a harder time getting the table top onto the
frame by myself. After lining up the table top(s) to their pre-drilled
bracket positions, I pulled them down against the frame and the table is done.
Only minor adjustments with the adjustable feet were needed to achieve my 0
degree with the smart level. |
|
Fiberglass
Storage and Cutting Cabinet/Table |
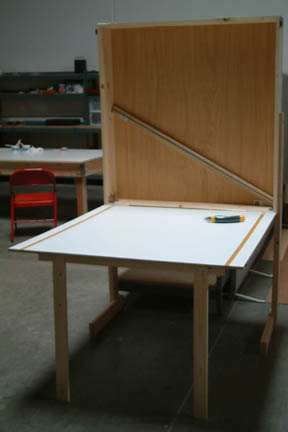  I
built the fiberglass storage cabinet as most builders. I
noticed most of the builders had it anchored to the wall. Since I am building my
Cozy in a warehouse and the walls are cement, I built a couple of legs
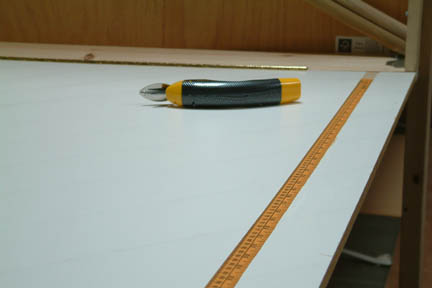
to stand it up. This way, I can move it around as needed. I also
embedded a couple of measuring tapes along the edge of the table such
that I can make the cut readily. To keep the door closed, I used a
couple of childproof door magnets (I used them around the house when my
daughters were little) to hold up the door/cutting surface. They work
well. I
built the fiberglass storage cabinet as most builders. I
noticed most of the builders had it anchored to the wall. Since I am building my
Cozy in a warehouse and the walls are cement, I built a couple of legs
to stand it up. This way, I can move it around as needed. I also
embedded a couple of measuring tapes along the edge of the table such
that I can make the cut readily. To keep the door closed, I used a
couple of childproof door magnets (I used them around the house when my
daughters were little) to hold up the door/cutting surface. They work
well.
 |
Epoxy Hot Box
|
|
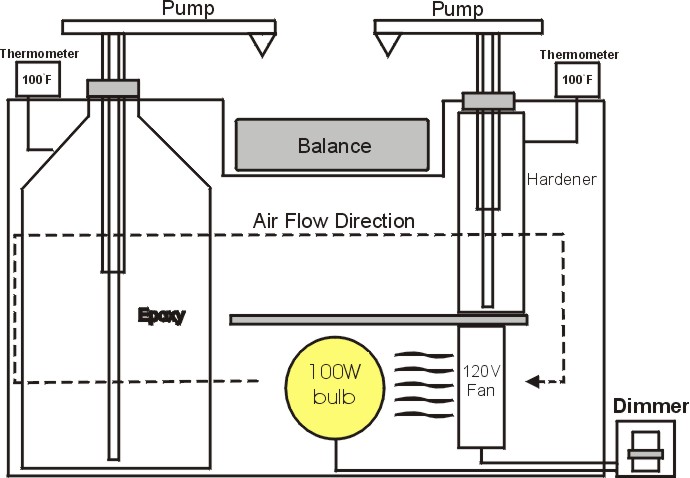
 I spent way too much time in
building the epoxy hot box. First, I couldn’t decide whether to use the Pump
or the Electronic Scale method. All the pros and cons between them gave me
decision indigestion. I eventually decided on the balance – I’d rather take
a bit more time to prepare the epoxy, but I’ll be certain of its mixing ratio
every time. I am sure mistakes will be made here and there, but it won’t be on
an extended period when the pump malfunctions. I spent way too much time in
building the epoxy hot box. First, I couldn’t decide whether to use the Pump
or the Electronic Scale method. All the pros and cons between them gave me
decision indigestion. I eventually decided on the balance – I’d rather take
a bit more time to prepare the epoxy, but I’ll be certain of its mixing ratio
every time. I am sure mistakes will be made here and there, but it won’t be on
an extended period when the pump malfunctions.
Pictures in the archives on
epoxy box designs (for the balance method) were limited. There are a couple
things I did differently:
1) At first, I did not use tin cans for holding the resin and hardeners
so that I could check
on the resin/hardener levels, their colors, and crystallization status readily.
I got three clear plastic Rubbermaid jugs from Target for $3.50 each that have
a cap and spigot. (That turned out to be a big mistake – note the color of
the hardener in the middle bottle. More discussion below.) |
|
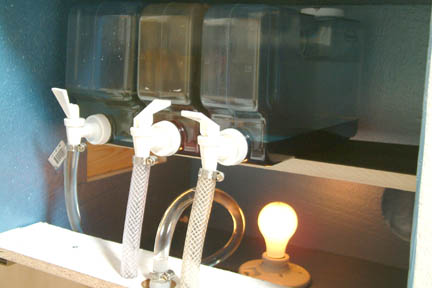
 2)
I wanted all the resin and hardeners (including those in the delivery hoses)
positioned inside the hot box instead of exposed in the open. I figured the
resin would get cooled down rather rapidly (especially on cold days) if a long
delivery tube were used between the hot box and the nozzle. It would serve no
purpose in heating the resin inside the box in the first place. As shown in
picture (right), almost all my resins and hardener are kept warm until they exit
from the valves. I used PVC ball valves from McMaster Carr – good quality, but
pricey. 2)
I wanted all the resin and hardeners (including those in the delivery hoses)
positioned inside the hot box instead of exposed in the open. I figured the
resin would get cooled down rather rapidly (especially on cold days) if a long
delivery tube were used between the hot box and the nozzle. It would serve no
purpose in heating the resin inside the box in the first place. As shown in
picture (right), almost all my resins and hardener are kept warm until they exit
from the valves. I used PVC ball valves from McMaster Carr – good quality, but
pricey.
3) At this time, Home Depot and Lowes stopped carrying in-line thermostats (yes,
I looked in the thermostat, electrical and water heater sections). I finally
tried an air duct thermostat. My dry run showed an excessive temperature range
inside the epoxy box (from 82-114 degrees) between the on-off cycles of the
light bulb – though the mass of the epoxy may be more stable. I was not
satisfied. I tried repositioning the two thermometers at various locations
inside the hot box with same disappointing results. I finally decided to use a
dimmer (as someone suggested in the Archives – thank you!) and was able to keep
a much more consistent internal temperature. Now my 100 watt light bulb is on
all the time at ~30% level – controlled by the dimmer. My internal temperature
is kept within 5 degrees F throughout the day.
|
Problems with the Epoxy Box
Besides the nitrogen
contamination (discussed below), one of my hose clamps slipped off the
spigot during the night. Ended up dumping ½ a gallon of epoxy in the hotbox, on
the table, scale, floor etc. Took me ½ day to clean it up and totaled Epoxy Box
#1 .
.
Epoxy
Color Change (Nitrogen Contamination) Problem
I decided to use MGS L285 epoxy
system with H285F (Fast) and H287S (Slow) hardeners. I bought them from AS&S
and transferred them into individual plastic containers inside the hot box (refer to hot
box figure). The epoxy is light yellow in color while the hardeners are cool
blue.
About 2 days later, the
H285F hardener turned reddish brown while the H287S hardener turned to the same
color at the delivery nozzle. Since I could not find any discussion on this
particular hardener, I posted the question to the Cozy builder’s Group as well
as the Technical Support guru of MGS from Canada.
It appears that the hardeners
are sensitive to CO2, which will turn brown after short exposure to air. The
plastic jugs I was using (above) were permeable enough for the CO2 to
‘sneak’ inside the bottles and contaminate the hardeners. Though MGS tech
support from Canada feels if the epoxy and hardeners behave normally, they
should be OK to use. Since I am new to this process, I certainly was not
comfortable with it. Besides, they looked ugly. I decided to replace them with
new ones.
| Enter Hot Box
#2 |
 I built epoxy box #2 a little differently from #1. I
switched to tin can containers (should have listened to the wise men before me)
for the epoxy and hardeners, using a 1-gallon can for the epoxy and 1-quart cans
for the hardeners. I also learned from the Cozy group to put a small hole in the
lids and seal them with masking tape when they are not in use. In addition, I
cut up round pieces of plastic sheets and laid them atop the epoxy and hardeners
inside the cans. This minimizes contact between the hardeners and CO2 in the
air. I had this set up for nearly a month now and no discoloration thus far!
I also made the door opening from the top. When I
run out of material, I just pop the lids off and pour in epoxy or hardeners as
required. No need to move the cans at all. The delivery hoses are inside the hot
box, keeping almost all the epoxy & hardeners in elevated temperatures at
all times. It turned out that a 25-watt light bulb is more than adequate to keep
my box between 95-105 degrees F. I still have to turn my dimmer way down to
maintain its 100 degrees temperature. Must have done a good job on insulation J.
I have spent LOTS of time on the epoxy box –
hope it’s worth the effort. Well it was not! Read on...
|
| Enter Hot Box
#3 |
| Well, I did not like
the ball valves used in Hot Box #2 because it has a slight delay between the
time I shut off the valve and the time it stops dripping. Making it difficult to
control the exact amount of epoxy and hardener into the cup. In addition, my
balance took a fraction of a second delay to report the exact weight as well.
The bottom line - I had a tough time getting the exact epoxy to hardener ratio
to the precision I liked. Enter Hot Box #3... |
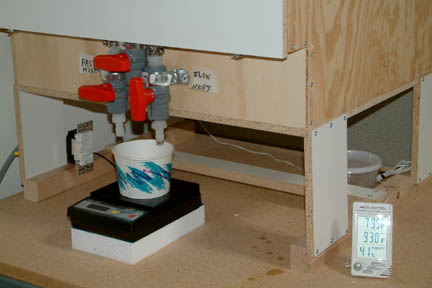
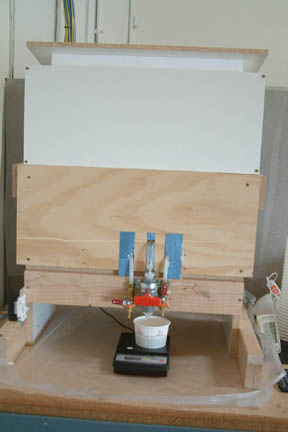
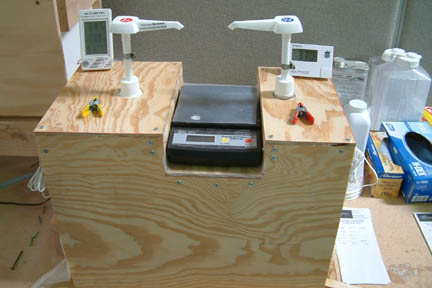
 This time I got a
couple 1 ounce squirt pumps from Aircraft Spruce for this Hot Box. They cost
$4.50 each. I have to
modify one of the caps (left) to fit the plastic epoxy jug . The other cap fits
perfectly with the metal can for the hardener. I built a small box to enclose
them for heating. I have 2 separate thermometers attached to the bottles to make
sure the internal heating is evenly distributed. The balance is mounted at
the middle (as shown) such that I can monitor the mixing ratio every time. The heating of the
epoxy & hardener is done with a 100 Watt light bulb and a 120V cooling fan.
The cooling fan is for circulation. I tied both the light and fan to a dimmer /
on-off switch. So if I wanted to heat up the epoxy faster, I turn up the dimmer
which in turn, cranks up the light and fan accordingly. After a few trials, I
found the 'appropriate' settings for the dimmer and do not find the need for a
thermostat thus far. This time I got a
couple 1 ounce squirt pumps from Aircraft Spruce for this Hot Box. They cost
$4.50 each. I have to
modify one of the caps (left) to fit the plastic epoxy jug . The other cap fits
perfectly with the metal can for the hardener. I built a small box to enclose
them for heating. I have 2 separate thermometers attached to the bottles to make
sure the internal heating is evenly distributed. The balance is mounted at
the middle (as shown) such that I can monitor the mixing ratio every time. The heating of the
epoxy & hardener is done with a 100 Watt light bulb and a 120V cooling fan.
The cooling fan is for circulation. I tied both the light and fan to a dimmer /
on-off switch. So if I wanted to heat up the epoxy faster, I turn up the dimmer
which in turn, cranks up the light and fan accordingly. After a few trials, I
found the 'appropriate' settings for the dimmer and do not find the need for a
thermostat thus far. |
 If you look closer,
you can see I have a hose clamp around the neck of both pumps. They are my
'calibration' stops. I have the epoxy set to .5 oz per squirt and .2 oz per
squirt for the
hardener (100:40 ratio for MGS 285 by weight). This way I can go for small amount with a
single pump and larger amount with multiple pumps. Surprisingly, the pumps
were quite accurate (+/- .002 oz). Now I do not have to keep turning the ball values on and
off to get the right ratio. Each squirt gives me the exact amount of
epoxy/hardener and I can verify the ratio at the same time with the balance. In
addition, I use the original containers for the epoxy and hardener - no transfer
needed. I wrap the nozzles with a couple of sandwich bags between use and
clamp them close with the clamps (yellow and red). So far, I like my Epoxy Box
#3. More reliable and quicker! If you look closer,
you can see I have a hose clamp around the neck of both pumps. They are my
'calibration' stops. I have the epoxy set to .5 oz per squirt and .2 oz per
squirt for the
hardener (100:40 ratio for MGS 285 by weight). This way I can go for small amount with a
single pump and larger amount with multiple pumps. Surprisingly, the pumps
were quite accurate (+/- .002 oz). Now I do not have to keep turning the ball values on and
off to get the right ratio. Each squirt gives me the exact amount of
epoxy/hardener and I can verify the ratio at the same time with the balance. In
addition, I use the original containers for the epoxy and hardener - no transfer
needed. I wrap the nozzles with a couple of sandwich bags between use and
clamp them close with the clamps (yellow and red). So far, I like my Epoxy Box
#3. More reliable and quicker! |
[Hindsight]
I have been using this set up for 3 years now (about 7.5 gallons of resin and 15
quarts of hardener) and have no problem with it. I
leave the system at room temperature, only to heat it up when I do a lay up.
There are times the system sits 'dormant' for 2 - 3 months. The system is
located in a warehouse in Southern California where room temperatures range from
40oF in winter and 100oF in summer. There has been no crystallization
or sludge build up with the hardener as many builders have experienced (I used
slow hardener only). It MAY be contributed by using the original can and sealing
the pumps with a sandwich bag between use. The only maintenance needed so far
includes changing out the hardener pump a couple times (hardener build up at the
neck) and clearing the hardener nozzle with a stiff wire or a nail periodically.
[Hindsight] Since
the development of Box # 3, quite a few builder made improvements on the
original design. Look around various builder sites and you will find some new
additions to this original model. They ranges from additional access doors for
replacing light bulbs to fancy circuit designs constant temperature control to
mixing ratio measurements. Check out:
http://cozy.caf.org/epoxy-hot-box/index.shtml (Charles Cozy) or contact
Robert Asis at hbcozy@yahoo.com
| Small
Volume Applications |
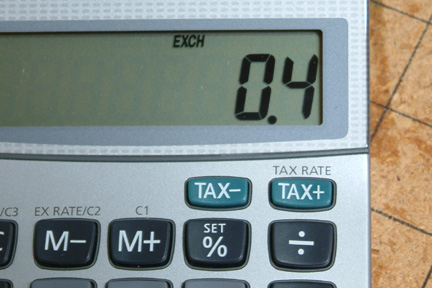 There
have been many many occasions where I needed just a teenie weenie bit of epoxy to
finish the job. I did not need even a single pump's worth. So I just tap the resin pump
a bit for a few drops, but now I have to figure out how much hardener to put in.
I went to K-mart and got one of those cheap calculators that have a TAX button. I
programmed the TAX to be 40% (the local politicians would love this There
have been many many occasions where I needed just a teenie weenie bit of epoxy to
finish the job. I did not need even a single pump's worth. So I just tap the resin pump
a bit for a few drops, but now I have to figure out how much hardener to put in.
I went to K-mart and got one of those cheap calculators that have a TAX button. I
programmed the TAX to be 40% (the local politicians would love this )
- that happens to be my MGS 285 mixing ratio. So for example, my drop of resin
turned out to weigh 0.035 oz, I just enter .035 into the calculator and then hit
the tax button. It will show me the total weight I need to come up to with the
hardener. Quite simple and comforting. )
- that happens to be my MGS 285 mixing ratio. So for example, my drop of resin
turned out to weigh 0.035 oz, I just enter .035 into the calculator and then hit
the tax button. It will show me the total weight I need to come up to with the
hardener. Quite simple and comforting. |
Practice Lay Ups
While awaiting for the answers
to my hardener color problem, I proceeded to work on the practice lay up kit I
bought from Aircraft Spruce. I did not use the kit supplied by EZ Epoxy, instead, I chose
to use the MGS 285 because: 1) I figured I may as well learn with the epoxy
system I plan to use; and 2) use up the epoxy and hardener in question, since I
won’t be flying the practice lay up parts anyway.
Cutting the fiberglass with the
Dritz electric scissors (recommended by Schneider) – its awesome! Don’t think
I’ll use a regular pair of scissors any more.
I did not follow the practice
kit instructions exactly because I wanted to try out John Slade’s poor man’s
vacuum procedure. Instead of using wax or butcher’s paper, I bought the 4-mil
plastic from Home Depot for the practice. I cut out a sheet of plastic, double
the size of the lay up. Once I completed the 6 BID lay up on one side of
the plastic, I folded the other half of the plastic over, like a book. I then
squeezed out the excess epoxy to the sides as carefully and gently as I could.
Since I was using the slow hardener only, I waited 6 hours before proceeding
with the knife trim – that was too late. I ended up taking the piece to the band saw. The weight comes to 11.2 oz – almost perfect (according to the
instructions, 11 oz is most desirable). After it cured, I inspected the 6 BID
lay-up carefully. To my disappointment, I found NUMEROUS air bubbles on the
under side of the lay-up and some in the middle layers, none on the top two
layers.
  I
decided to try the process again – the real project will not start until I get
it right! Since I was running out of BID from the practice kit (they don’t
give you extras for a 2nd try), I had to cut down the size of the
lay-up to 6”x6”– still 6 BID though. This time I put a lot more pressure
in squeezing out the air bubbles. In addition, I turned the part over and
squeezed the bottom side as well. Waited for 4 hours, cut to size and weighted.
Projected weight of this new part equated to 9.2 oz – a reduction of 16% of
standard desirable result. Careful inspection reviewed no air bubbles, no glass
fiber showing, and smooth surfaces. (Thank you Slade!) The good on the left and
the bad on the right – skylight was the light source. I
decided to try the process again – the real project will not start until I get
it right! Since I was running out of BID from the practice kit (they don’t
give you extras for a 2nd try), I had to cut down the size of the
lay-up to 6”x6”– still 6 BID though. This time I put a lot more pressure
in squeezing out the air bubbles. In addition, I turned the part over and
squeezed the bottom side as well. Waited for 4 hours, cut to size and weighted.
Projected weight of this new part equated to 9.2 oz – a reduction of 16% of
standard desirable result. Careful inspection reviewed no air bubbles, no glass
fiber showing, and smooth surfaces. (Thank you Slade!) The good on the left and
the bad on the right – skylight was the light source.
Unfortunately, the 4-mil plastic
does have wrinkles on it and I cannot remove them with a hair drier easily, as
Slade suggested. I did find a source from Chicago that will supply me a 4-mil
clear plastic sheet in 4'x 200’ for $30+. Will see how good it is when it
gets here. |
On
With the Confidence Practice
I also completed the confidence
practice – 4 plies on both sides of a foam strip as instructed. The composite
structure is strong and was very difficult to break. Took a 280 lb guy to jump
down on it while supported at both ends.
I also completed the bookend and
airfoil assemblies. Learned quite a bit of the process through these exercises.
I highly recommend it to anyone who is not familiar with the process. I can see
my workmanship improve as I move from one exercise to the next and my speed
increases as well.
After spending a total of 306 hours on workshop
preparation, setup and training exercises, I finally ordered the materials for
Chapter 4–7. I am ready for the REAL THING! 