Chapter
18 - Section 8
Installing
the Turtleback
Making
the 1/16" Shims
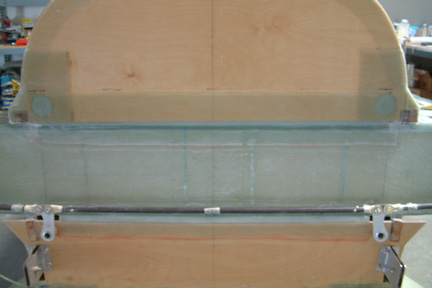
I
made 5 1/16" shims and taped them down at designated locations per plan. I
did not use any shim at the right rear hinge location since my TB is already
resting on top of it (the hinge material is 1/16" thick). The tape was for
holding the shims down during the trial fit step. The tapes were removed when I floxed
the TB in place later on.
Lining
Up the Turtle Back Against the Firewall
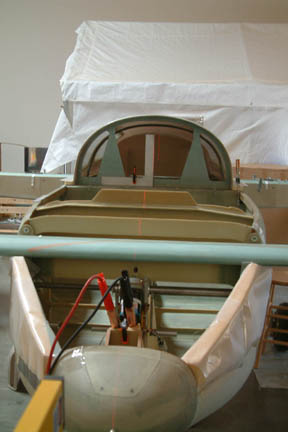
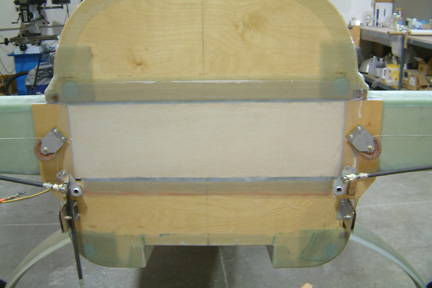
I
placed the TB on top of the longerons with its aft end against the firewall. The
curvature of the TB fits the firewall very well - its almost flush along the
entire seam. However, I noticed the center line of TB-1 was not lined up to
the center line of the fuselage. I thought the TB-1 could have moved when I
floxed it onto the TB, but I decided to take some measurements to make sure
everything is in the right place...
I
took the TB off from the top of the fuselage and re-established the center line
of the TB - front and back, as well as the TB-1.
Lining
Up the Turtle Back
 I
set up the laser on the center line of the fuselage. Then I placed the TB back on
top of the longerons with its new center points (base of TB-1 and mid-point at
the top aft of TB). I was surprised that when everything is lined up to center, I
have a gap (~1/4") on one side of the TB and the firewall. The only cause
(I can think of) is the firewall not being perfectly square to the fuselage. I
set up the laser on the center line of the fuselage. Then I placed the TB back on
top of the longerons with its new center points (base of TB-1 and mid-point at
the top aft of TB). I was surprised that when everything is lined up to center, I
have a gap (~1/4") on one side of the TB and the firewall. The only cause
(I can think of) is the firewall not being perfectly square to the fuselage.
|
Squaring
of the Firewall
With
the TB off again, I
took a measurement between the bottom edge of the firewall (left and right) to
the centerline on top of F22. Both distances were exactly the same (IIRC it's
~83.5"). The firewall is also vertical per Section 7. I measured and
re-measured with no better luck.
|
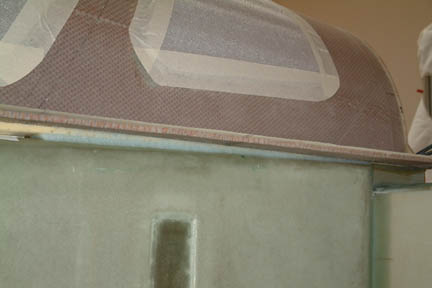 I
finally gave up and floxed the TB in place. Though the plan allows
trimming of the TB by a 1/4", I decided to leave the TB lined up to the
center line and used flox to fill in the gap later on. Note the flox fill under
the TB... The 1/16" shim and the sliver of foam are buried inside the flox
fill. My flox fill is more like a sliver because I raised my TB by 1" at
the front. I
finally gave up and floxed the TB in place. Though the plan allows
trimming of the TB by a 1/4", I decided to leave the TB lined up to the
center line and used flox to fill in the gap later on. Note the flox fill under
the TB... The 1/16" shim and the sliver of foam are buried inside the flox
fill. My flox fill is more like a sliver because I raised my TB by 1" at
the front.
|
Trimming
and Glassing the TB Flange
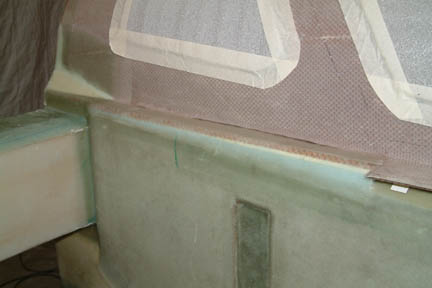 I
trimmed the TB flanges per plan, then I radius the flange edge to the fuselage
curvature. I further filled the gaps with flox and glassed the permanent part of
the TB in place with 2 layers of BID. I contemplated using micro instead of
flox but decided not to. I ended up using a lot of flox to fill in the honeycomb
holes - so that there are no bubbles underneath the BID. Should have used
micro??? I
trimmed the TB flanges per plan, then I radius the flange edge to the fuselage
curvature. I further filled the gaps with flox and glassed the permanent part of
the TB in place with 2 layers of BID. I contemplated using micro instead of
flox but decided not to. I ended up using a lot of flox to fill in the honeycomb
holes - so that there are no bubbles underneath the BID. Should have used
micro???
|
Glassing
in the Firewall (External)
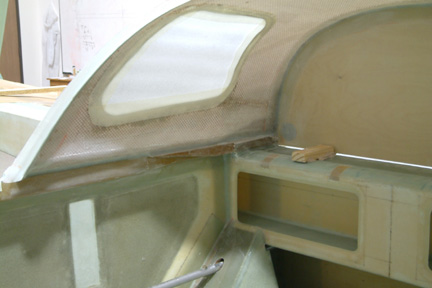
I
filled the gap between the firewall and the aft end of the TB (only the left
side had a gap) with flox. Then I smoothed out the seam (as needed) with flox
such that the glass will lay down nicely at the transition. I glassed in with 2
plies of BID per Fig. 26 section B-B. I also peel-plied the entire BID layer though
the plan did not specify.
Once
the TB is glassed to the fuselage and firewall, it would not be possible
for me to crawl back in to do any inside work until I cut open the TB in Section 11.
Many
months later.....I
returned to these tasks after I completed Section 11...
Trimming
and Glassing Inside TB
 I
have to do some trimming and cleaning up at the inside seams between the TB and the fuselage. Once completed, I taped the internal seam between
the firewall and TB as shown in Fig. 27 Section B-B (I had already done the
outside earlier). I
have to do some trimming and cleaning up at the inside seams between the TB and the fuselage. Once completed, I taped the internal seam between
the firewall and TB as shown in Fig. 27 Section B-B (I had already done the
outside earlier).
|
Glassing
the Dreaded 6...
 I removed the bonded support boards and taped in the 'dreaded' 6 plies between
the firewall and the center section spar. Though its a bit of work, it
turned out nicely...
I removed the bonded support boards and taped in the 'dreaded' 6 plies between
the firewall and the center section spar. Though its a bit of work, it
turned out nicely...
I
also floxed in the two (2) plywood pieces along the back side of the firewall
per plan. While charging forward at a good pace...I ran out of high density
foam!!! That has to wait till another day...
|
|
 That
another day was more than a month later. I finally got a chance to get back
to building. I picked up a piece of Clark foam from ACS on Saturday morning and
cut it to size to fit into the depression. I
microed the foam to the aft face of the center section spar and filled the
perimeter of the foam with flox. Before the flox cures, I glassed the entire
surface with 1 layer of BID per plan. That
another day was more than a month later. I finally got a chance to get back
to building. I picked up a piece of Clark foam from ACS on Saturday morning and
cut it to size to fit into the depression. I
microed the foam to the aft face of the center section spar and filled the
perimeter of the foam with flox. Before the flox cures, I glassed the entire
surface with 1 layer of BID per plan.
|