I
fit the top halves of the canopy hinges to the lower halves with 3 layers
of duct tape in between (per plan). Then I laid the canopy back on the fuselage and
checked for fit. I had un-even spots along the mating surfaces of my canopy and
the longerons. In addition, the top of the TB/canopy did not quite
line up. What happened![]() .
.
It took me at least a couple of days of sanding and checking to get the canopy to sit reasonably well. The mating surfaces are still not perfect along the full length of the longeron/canopy. The air gap at various spots is about .08" max. Regardless of what I do, I cannot get rid of the gaps between the top hinge and the canopy contact points. I finally called it quits...
Instead of 4 alignment pins per plan (one at each corner), I used eight alignment pins. One at each corner per plan plus two (2) more at each side of the cut line - both sides. The reason for the additional alignment pins was to insure the positioning of the forward and aft canopy deck - after they have been sawed through and separated (later). These extra alignment pins were a life saver. You can see my additional alignment pins 5 pictures below.
Attaching Top Hinges to Canopy
|
|
|
Installing Hinge Bolts
The challenge on this step was fitting the nuts into the holes as well as holding it in place while tightening. I overcame this challenge by turning down the outside diameter of the nuts (just a hair) and a wrench socket, using my table-top lathe. I only have to trim down a couple bolts to keep them below the canopy deck surfaces. It
is most rewarding to be able to open and close the canopy with the hinges in
place |
Cutting the Canopy Deck
I decided to use a jig saw instead of a hand saw at the last minute. If you look closely, you can see my double cut lines. Using a jig saw and maintaining the cut inside the two cut lines was much easier than expected. The cut turned out OK. BTW, I removed the canopy off the fuselage before making the cut - didn't think the jig saw blade would be friendly with the instrument panel or longerons. |
Glassing the Cut Line Surfaces
On the other hand, I did not like to leave the exposed foam at the cut line for long. I decided to jump ahead and glass both surfaces at the same time. I prepared the flox corners and glassed both surfaces with 1 & 2 ply BID layers respectively per plan. I applied peel-ply and a sheet of plastic wrap in between (as shown in picture). Then I put the canopy back on its hinges (remember I jumped ahead and hung the canopy to its hinges first?) as well as all eight alignment pins. If you look closely, you can see the two alignment pins at both sides of the cut line. I highly recommend these extra alignment pins because they do not allow any 'wiggle room' - thus no chance for any slop in alignment. |
|
You can see the matching edge (i.e. the forward deck) in the 3 pictures below... |
I decided to jump ahead (Section 16) and flox the upper hinges onto the bottom side of the forward deck. With the 4 alignment pins in place, I prepped the mating surfaces per plan, spread wet flox onto the hinges and forward deck, taped down and let cure. Once cured, I removed the forward deck, flipped it over and packed all voids underneath the hinges with wet flox and let cure. You can see the side hinges and forward hinge (not to plan) are already in place in the picture below.
Installing the Drip Rail (Not to Plan)
I followed the plans direction in securing the forward deck with bondo and stir sticks. |
|
|
|
If you may recall, the width of my seam (at the cut line) is not much more than .008" and with a tight gap between my extended 'drip rail' and the canopy frame, there is little room for any moisture to come through - and I haven't put in my seal yet... |
 My
top hinges do not make perfect contact with the under side of my canopy deck -
in fact, I have some pretty good gaps at various spots. To remedy the problem, I
slopped a line of flox along the center of the top hinge, then lay the canopy on
top of it. Then I slipped in the 8 alignment pins and let it cure.
My
top hinges do not make perfect contact with the under side of my canopy deck -
in fact, I have some pretty good gaps at various spots. To remedy the problem, I
slopped a line of flox along the center of the top hinge, then lay the canopy on
top of it. Then I slipped in the 8 alignment pins and let it cure.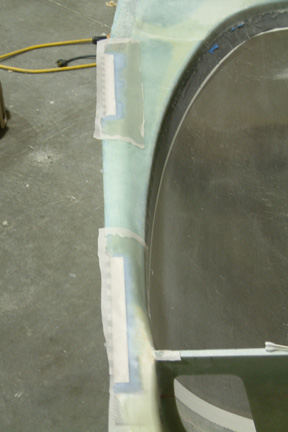 After
the flox cured, I removed the hinge pins and turned the canopy over (with the
top hinge sides attached). I made more wet flox and packed all the voids under the
hinges and the bottom sides of the canopy deck. Next I filled in all the
depressions the plan told us to dig out earlier. Then I carefully laid up 2
plies of BID to keep all the flox and hinges in place. It turned out OK.
After
the flox cured, I removed the hinge pins and turned the canopy over (with the
top hinge sides attached). I made more wet flox and packed all the voids under the
hinges and the bottom sides of the canopy deck. Next I filled in all the
depressions the plan told us to dig out earlier. Then I carefully laid up 2
plies of BID to keep all the flox and hinges in place. It turned out OK.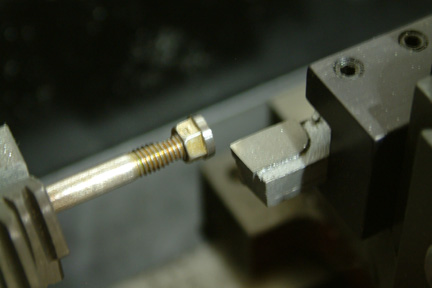 Since
I have the canopy off the fuselage, I decided to install the hinge bolts at this
time (instead of later per plan). I marked all the hole locations and drilled all the way through
the hard points. Then I flipped the canopy right side up and opened up the bolt holes
(with a counter bore) to fit the nuts - making sure I retained at least .25"
fiberglass between the bolt heads and nuts.
Since
I have the canopy off the fuselage, I decided to install the hinge bolts at this
time (instead of later per plan). I marked all the hole locations and drilled all the way through
the hard points. Then I flipped the canopy right side up and opened up the bolt holes
(with a counter bore) to fit the nuts - making sure I retained at least .25"
fiberglass between the bolt heads and nuts.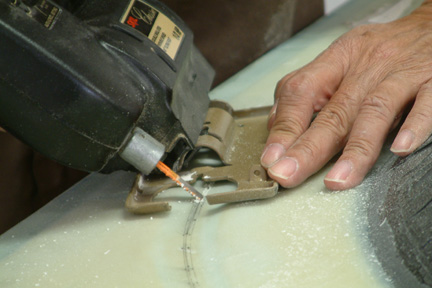 The
plans'
direction is to cut a 1/8" slot with a hand saw at 45o. I expect
this to be a difficult cut and that it may be hard for me to keep a smooth cut along
the cut line while maintaining the 45o angle. I decided to mark two
cut lines 1/8" apart. I will maintain my cut within the two cut lines. Once
cut, I take a sander and bring the edges to the cut lines - thus providing the
1/8" separation per plan.
The
plans'
direction is to cut a 1/8" slot with a hand saw at 45o. I expect
this to be a difficult cut and that it may be hard for me to keep a smooth cut along
the cut line while maintaining the 45o angle. I decided to mark two
cut lines 1/8" apart. I will maintain my cut within the two cut lines. Once
cut, I take a sander and bring the edges to the cut lines - thus providing the
1/8" separation per plan. 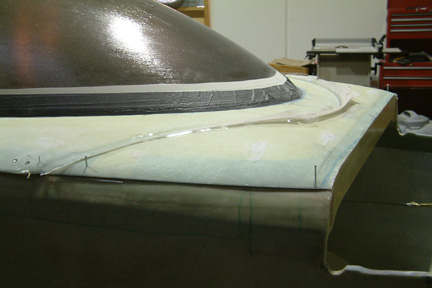 I
deviated from the plan sequence a bit here. I delayed glassing the drip rail
across the cut line. You'll see later on, I actually skipped the balsa and drip
rail part and did the lay-up quite a bit differently.
I
deviated from the plan sequence a bit here. I delayed glassing the drip rail
across the cut line. You'll see later on, I actually skipped the balsa and drip
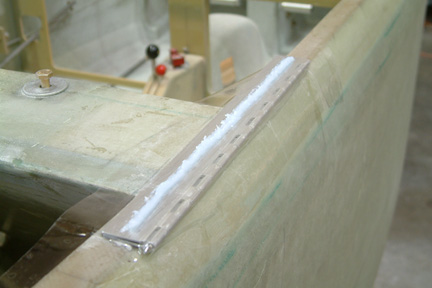
rail part and did the lay-up quite a bit differently. 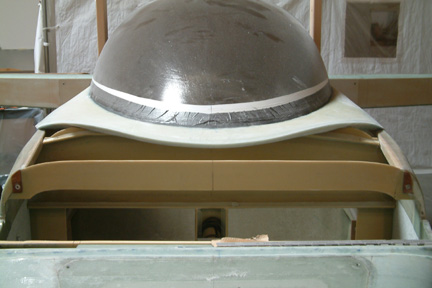 Here's
a picture of the cut line after cure and sand down, The seam between the
canopy and the instrument cover is tight but has no contact. I can slip a .004"
shim along the seam with no obstruction, but I will hit a few tight spots with a
.008" shim. It's good enough for me!
Here's
a picture of the cut line after cure and sand down, The seam between the
canopy and the instrument cover is tight but has no contact. I can slip a .004"
shim along the seam with no obstruction, but I will hit a few tight spots with a
.008" shim. It's good enough for me! 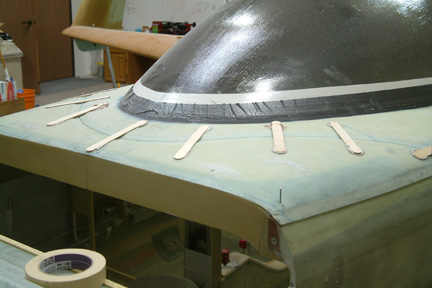 The
plan requires us to build a 1/8" spacer on the underside of the canopy deck
in preparation for the drip rail. On the other hand, the plan also suggested
making the most room under the canopy deck for future instruments. I decided to
skip the 1/8" spacer and used packing tape instead. In addition, I extended
the drip rail all the way to the aft edge of the canopy deck.
The
plan requires us to build a 1/8" spacer on the underside of the canopy deck
in preparation for the drip rail. On the other hand, the plan also suggested
making the most room under the canopy deck for future instruments. I decided to
skip the 1/8" spacer and used packing tape instead. In addition, I extended
the drip rail all the way to the aft edge of the canopy deck. 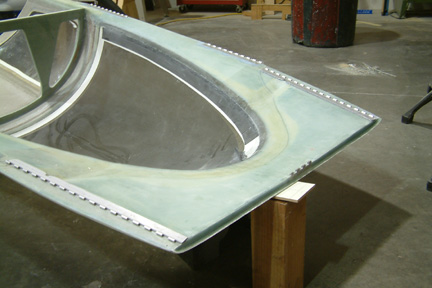 Susann
helped me to pick up the entire canopy assembly and lay it down carefully on
its back. I was surprised how well the stir sticks held the forward deck in
place. On the other hand, I may be using too much bondo (again!) and its going
to be hell to pay in removing them later on...
Susann
helped me to pick up the entire canopy assembly and lay it down carefully on
its back. I was surprised how well the stir sticks held the forward deck in
place. On the other hand, I may be using too much bondo (again!) and its going
to be hell to pay in removing them later on...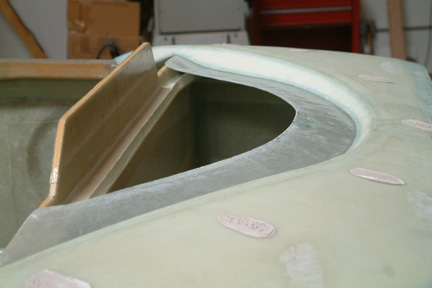 Once
cured, I separated the forward deck from the canopy frame and trimmed off the rough
edges of the drip rail. As shown, my drip rail extends to the edge of the
canopy. The real purpose of this extension is to make the instrument panel cover
and the forward deck as a single piece (the plan method is two separate pieces).
I will discuss my reasoning in Section 16.
Once
cured, I separated the forward deck from the canopy frame and trimmed off the rough
edges of the drip rail. As shown, my drip rail extends to the edge of the
canopy. The real purpose of this extension is to make the instrument panel cover
and the forward deck as a single piece (the plan method is two separate pieces).
I will discuss my reasoning in Section 16.