Chapter
21 - Section 9
Pressure
Test
I
decided to perform the pressure test prior to glassing the top skin because if
there is a leak, I can make the repairs directly at the seal without breaking
through the glass layers.
Building
A Manometer
This
section requires us to perform a pressure/leak test after the tank is sealed.
Since I do not have an altimeter (as suggested per plan), I decided to build a
simple manometer (as many builders have done) to detect the presence (or absence)
of a leak. I translated the 1,500 feet of altimeter to ~20.5224" of water.
However, many discussions in the Cozy forum suggested that 15"-18" of
water is adequate.
Let
The Test Begin!
I
wrapped all the plug threads with Teflon tapes - they include the fuel probe,
fuel drain at leading edge, fuel drain at sump, fuel outlet pipe and fuel return
pipe. Then I hooked the manometer to the vent line and kept it air tight with a
miniature pipe clamp. With the blue shut off valve open (shown above), I blew
into the tank. I didn't anticipate 26 gallons of compressed air could give you a
pretty good head rush ...Once
the water level reaches the 18" mark, I closed the shut off valve quickly.
I was really puzzled when I shut off the valve, the water level drops
immediately a couple of inches, then it oscillated a bit and proceeded to drop
slowly...~!@#$%... the Leaky Goblin just announced its arrival
...Once
the water level reaches the 18" mark, I closed the shut off valve quickly.
I was really puzzled when I shut off the valve, the water level drops
immediately a couple of inches, then it oscillated a bit and proceeded to drop
slowly...~!@#$%... the Leaky Goblin just announced its arrival .
.
But
wait - I ought to check all the plug and plumbing connections first. I went to
K-mart's toy department and bought a bottle of Bubble soap and brushed the soap
around all the connections (one by one) and found leaks in all of them!!! I
spent a couple of hours tightening plugs (back and forth), blowing in more air,
tightening plugs, blowing in some more air... just to chase out all the leaky
connections. I was beginning to sense that I'll go brain dead before I am done
with both tanks!
Regardless
how quickly or slowly I blew into the tank, there was always some drop in water level
(from a couple of inches to 1/2") before it stabilizes. The only
explanation I can think off is that the compressed air is warm when it enters
the strakes, but it cools down quickly - reducing in volume, resulting in a drop in
water level. I expect this phenomena will be more acute when blowing the air in
manually - but I was not motivated to test this theory out at the time.
I
concluded that my tanks are leak free ...!!!!
It
is important to note that as the room temperature rose to as high as 29 - 30oC,
I can see the tank skins were budging a bit - just a word of caution. Rise in
room temperature through the day can do a number on your tanks if you do not
watch it closely!
Now,
back to Section 8 to complete the glassing of the top skin...
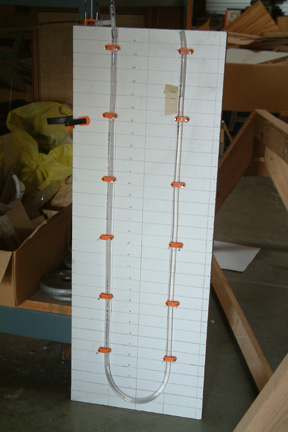 Building
the manometer was actually quite simple. It requires a flat board (~30" x
8"), 10' of clear vinyl tubing (1/4" ID, 3/8" OD), a plastic
barbed T, a plastic shut off valve, several anchoring clamps - all available
from Lowes.
Building
the manometer was actually quite simple. It requires a flat board (~30" x
8"), 10' of clear vinyl tubing (1/4" ID, 3/8" OD), a plastic
barbed T, a plastic shut off valve, several anchoring clamps - all available
from Lowes.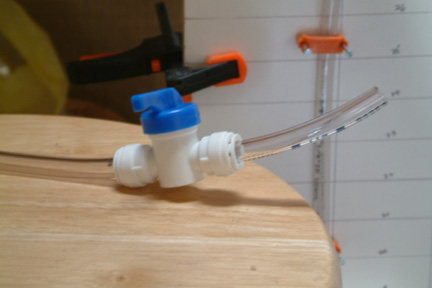 Before
I tied my home made manometer to the closed fuel tank, I wanted to make sure the
connections of the manometer are air tight. So I plugged up the
tube end that is supposed to tie to the tank. Since 18" is not a whole lot
of pressure, I can easily blow on it and get my 18" of water - especially
when it is not tied to the tank. Here's a picture of the shut off valve for
feeding and shutting off the air to the system.
Before
I tied my home made manometer to the closed fuel tank, I wanted to make sure the
connections of the manometer are air tight. So I plugged up the
tube end that is supposed to tie to the tank. Since 18" is not a whole lot
of pressure, I can easily blow on it and get my 18" of water - especially
when it is not tied to the tank. Here's a picture of the shut off valve for
feeding and shutting off the air to the system.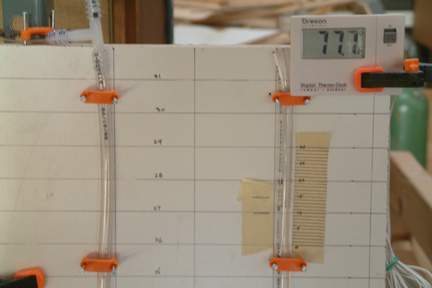 The
next day afternoon, I noticed the water mark actually rose up to higher location
than my original mark. Evidently, changes in room temperature change the water
pressure quite a bit - and was captured by this simple manometer. I was
surprised how sensitive this manometer was! I decided to get a feel for the
performance of the unit before using it to perform the pressure/leak test, I
added more resolution (1/10") to the scale. I also clamped a digital
thermometer next to it and took some pressure vs. temperature
data.
The
next day afternoon, I noticed the water mark actually rose up to higher location
than my original mark. Evidently, changes in room temperature change the water
pressure quite a bit - and was captured by this simple manometer. I was
surprised how sensitive this manometer was! I decided to get a feel for the
performance of the unit before using it to perform the pressure/leak test, I
added more resolution (1/10") to the scale. I also clamped a digital
thermometer next to it and took some pressure vs. temperature
data.  Enter
my trusted compressor and a tire valve from AutoZone. I know people recommend
not to use the compressor because you can delaminate the strakes if you are not
careful, but between the strakes and me, the choice was clear...
Enter
my trusted compressor and a tire valve from AutoZone. I know people recommend
not to use the compressor because you can delaminate the strakes if you are not
careful, but between the strakes and me, the choice was clear...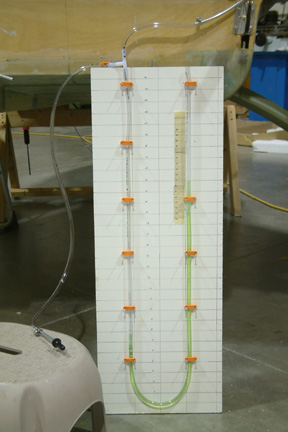
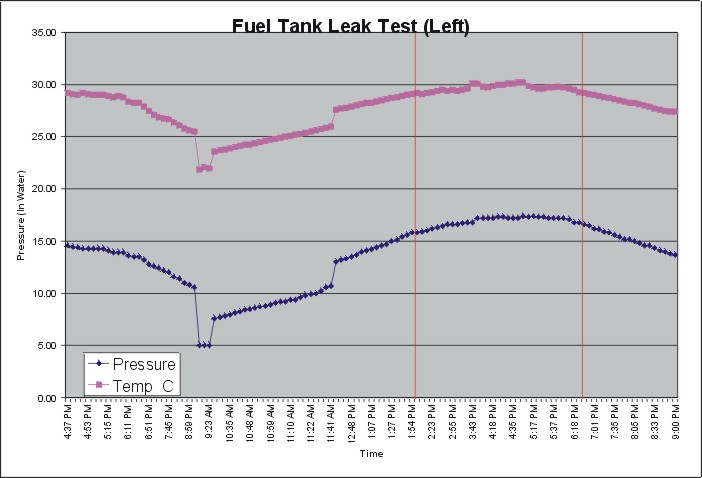 I
monitored the water pressure in the system vs. room temperature throughout
the test period. I converted the temperature to Celsius such that I can fit both
data onto the same scale.
I
monitored the water pressure in the system vs. room temperature throughout
the test period. I converted the temperature to Celsius such that I can fit both
data onto the same scale.