Preparing the Foam Pieces
 I
found some left over foam pieces when I built the original heat duct - perfect
I
found some left over foam pieces when I built the original heat duct - perfect![]() .
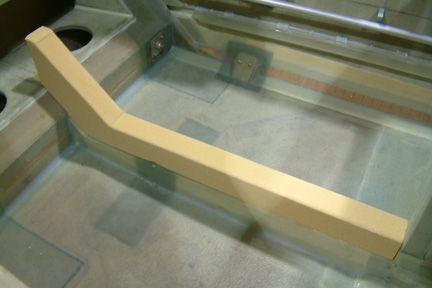
The foam is 1/4" thick - giving me a bit more room inside the duct. The height of the cover is a bit vague per the drawing in the Plan. I decided to
make mine to 2 1/4" wide and with the 1/4" cover at the top, giving me
a 2 1/2" total height. With 1/2" glass overhang, the total height of
my heat duct cover comes to 3" (as shown in the Plan). The width is exactly
the same as my heat duct below. If
you look close, I have a slight jog at the landing gear bulkhead - thus some
customization is warranted.
.
The foam is 1/4" thick - giving me a bit more room inside the duct. The height of the cover is a bit vague per the drawing in the Plan. I decided to
make mine to 2 1/4" wide and with the 1/4" cover at the top, giving me
a 2 1/2" total height. With 1/2" glass overhang, the total height of
my heat duct cover comes to 3" (as shown in the Plan). The width is exactly
the same as my heat duct below. If
you look close, I have a slight jog at the landing gear bulkhead - thus some
customization is warranted.
In order to keep the width of the duct consistent throughout its length, I cut a few rectangular foam pieces and fit them inside the trough. Next, I taped down the original heat duct with packing tape for release because the Plans call for a removable heat duct cover.
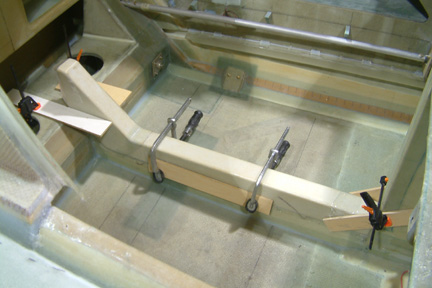 I
was running out of BID, but I have plenty of UNI on hand. I decided
to use UNI for the heat duct cover. I will add another layer of BID if it turns
out to be too weak. One advantage is that the UNI lays down nicely to the shape
of the heat duct cover. I decided to micro and glass the cover on my work bench
first, then I carefully sat the cover on top of the heat duct (already taped
down with packing tape). I have about 1/2" to 3/4" of glass
overhanging the sides of the heat duct. I clamped down a few wood pieces to make sure
the heat duct cover stayed in place during cure.
I
was running out of BID, but I have plenty of UNI on hand. I decided
to use UNI for the heat duct cover. I will add another layer of BID if it turns
out to be too weak. One advantage is that the UNI lays down nicely to the shape
of the heat duct cover. I decided to micro and glass the cover on my work bench
first, then I carefully sat the cover on top of the heat duct (already taped
down with packing tape). I have about 1/2" to 3/4" of glass
overhanging the sides of the heat duct. I clamped down a few wood pieces to make sure
the heat duct cover stayed in place during cure.