Shaping the Foam
 I
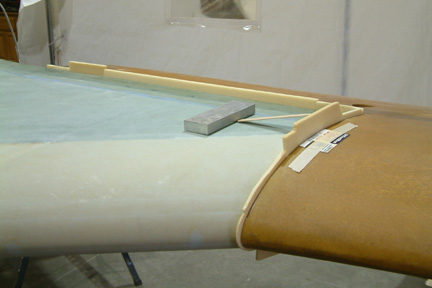
divided the foam shaping into 2 separate sections - the section over the bolts
and the normal gap areas. For the normal gap areas, I found trimming a strip of
foam (with a band saw) to slightly over 3/16" thick worked best. I drew a
line along the length of the foam strip, approximately 1" from the bottom
edge - this is the submerge mark. Then I rounded off the bottom edge slightly
and slipped the foam strip in the gap (up to the submerge mark) - some sanding was
needed of course! Now all my foam strips should have the same depth into the
gap. It makes the following glassing step a bit easier. The extra height of the
foam above the gap is not important at this time because they will be sanded off
in the next step.
I
divided the foam shaping into 2 separate sections - the section over the bolts
and the normal gap areas. For the normal gap areas, I found trimming a strip of
foam (with a band saw) to slightly over 3/16" thick worked best. I drew a
line along the length of the foam strip, approximately 1" from the bottom
edge - this is the submerge mark. Then I rounded off the bottom edge slightly
and slipped the foam strip in the gap (up to the submerge mark) - some sanding was
needed of course! Now all my foam strips should have the same depth into the
gap. It makes the following glassing step a bit easier. The extra height of the
foam above the gap is not important at this time because they will be sanded off
in the next step.
The foam over the bolts are similar, except it needs a bit more sanding and shaping. I also have to sand the bottom edge of the foam to accommodate the bolts as well. Separating these foam sections from the normal strips allows me to work with smaller strips and in the event I mess up, I can just scrap a small section only.
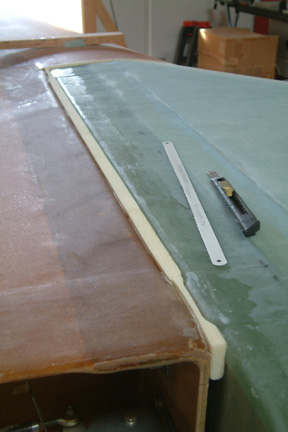 Here's
a picture of the foam after it has been sanded down. I used a hack saw blade to
cut a thin slot between the foam and the center section spar. The thickness of
the hack saw blade is about 1/32", which is about 50% of the thickness
called out per Plan. I just wanted to leave a bit of 'meat' in the foam just in
case I bump the foam while removing the wing, thus giving me a bit of foam for
recovery.
Here's
a picture of the foam after it has been sanded down. I used a hack saw blade to
cut a thin slot between the foam and the center section spar. The thickness of
the hack saw blade is about 1/32", which is about 50% of the thickness
called out per Plan. I just wanted to leave a bit of 'meat' in the foam just in
case I bump the foam while removing the wing, thus giving me a bit of foam for
recovery.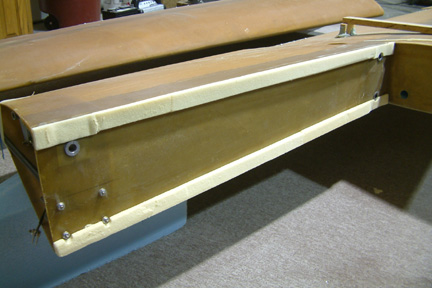 Here's
what the foam looks like after I remove the wings.
Here's
what the foam looks like after I remove the wings.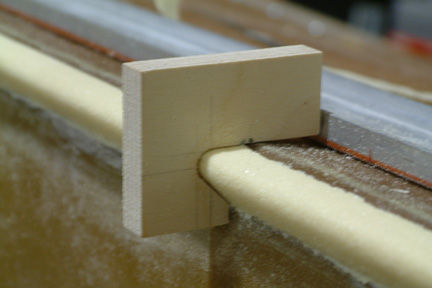 To
prepare the foam for glassing, I made a small wood block / fixture for the
occasion. This allows me to get a more uniform foam strip. Most importantly, it
keeps me from sanding too much foam off, thus losing the 1/16" gap between
the wing and the center section spar (as instructed per Plan).
To
prepare the foam for glassing, I made a small wood block / fixture for the
occasion. This allows me to get a more uniform foam strip. Most importantly, it
keeps me from sanding too much foam off, thus losing the 1/16" gap between
the wing and the center section spar (as instructed per Plan).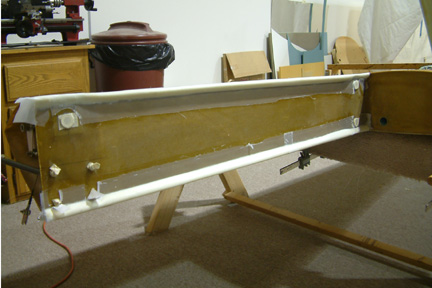 I
roughed up the neighboring glass for the 1 layer BID per Plan. Then I microed
the foam strips with wet micro. I also filled the voids and gaps with thick
micro. I applied 1 layer BID over the foam with 1" overlap along its sides
and peel-plied.
I
roughed up the neighboring glass for the 1 layer BID per Plan. Then I microed
the foam strips with wet micro. I also filled the voids and gaps with thick
micro. I applied 1 layer BID over the foam with 1" overlap along its sides
and peel-plied. 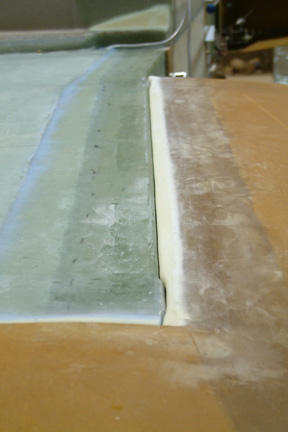 After
the glass cured, I removed the peel-ply, trimmed and sanded down the rough
surfaces. Susann and Cassandra helped me to put the wings back on. The moment of
truth...I did not lose the 1/16" gap between the wing and the spar
After
the glass cured, I removed the peel-ply, trimmed and sanded down the rough
surfaces. Susann and Cassandra helped me to put the wings back on. The moment of
truth...I did not lose the 1/16" gap between the wing and the spar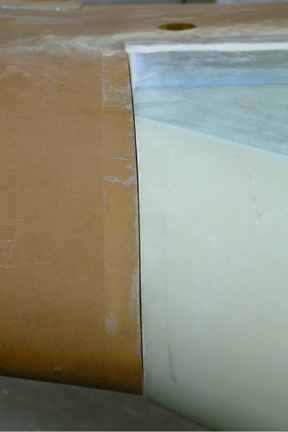 Here's
another look at the seam between the wing and spar...Its less than 1/16" as
instructed per Plan, more like 1/32". I believe the width will be fine when
I get to the sanding chapter.
Here's
another look at the seam between the wing and spar...Its less than 1/16" as
instructed per Plan, more like 1/32". I believe the width will be fine when
I get to the sanding chapter.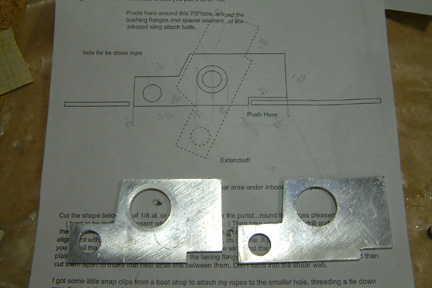 Since
I was working in this spar / wing interface area, I decided to make the tie down
set as well. I have yet to clean it up and eventually anodize the parts.
Since
I was working in this spar / wing interface area, I decided to make the tie down
set as well. I have yet to clean it up and eventually anodize the parts.